

The La Jolla Cluster Social Emotional Committee is happy to provide the following instructions on how to set up screen time limits on your child’s iPhone. While studies have shown there is no direct link between screen time and mental health disorders, everyone agrees that it is important for our children to have a healthy relationship with their devices, and limiting use is a good step in that direction. The majority of the following instructions were obtained from the website iMore.com.
https://www.imore.com/how-set-screen-time-your-child
https://www.imore.com/how-create-add-child-account-family-sharing
How to set up Screen Time for your child
Source: iMore
Having children in the age of technology presents parents with many challenges. One of the largest is making sure your loved ones are safe and healthy by limiting the time they spend staring at a screen. It's also important to monitor and restrict what they are doing during that time. With Screen Time, you can keep your family's device usage in check.
In iOS 13, Apple added more Screen Time tools for parents. Here's how to set up Screen Time for your child so you can be sure they're enjoying their new tech responsibly. There are two ways you can set up Screen Time controls for your child - through Family Sharing and directly on a device.
How to set up Screen Time for your child through Family Sharing
With Family Sharing, you create an Apple ID for your kids. In doing so, all members of a family can share their Apple purchases such as apps, music, and books. With Family Sharing, you can set Screen time rules for each individual family member, so you can be certain that everyone has settings that fit their needs and lifestyle. Family Sharing also allows you to control screen time on your child’s phone from your own phone as opposed to needing their device in your hand.
If you have not yet set up Family Sharing, please scroll to bottom for instructions. After you've added your child's account to Family Sharing, you can control their Screen Time settings by doing the following.
-
Launch Settings.
-
Tap on your Apple ID.
-
Tap Family Sharing.
-
Tap Screen Time to turn it on.
-
Once activated, go back out to Settings and select Screen Time from your main settings screen (not inside Family Sharing).
-
Scroll to bottom and select the child you want to limit under Family.
-
That screen is where you can choose: Downtime (e.g. set the phone to go off at a certain time at night and back on at a certain time in the morning); App Limits (e.g. set the phone to block all social media apps after a certain amount of time); Communication Limits (e.g. determine who your child can contact during downtime and allowed screen time); Always Allowed (e.g. select apps that are always allowed even during downtime such as Find My Friends for location); Content & Privacy Restrictions (e.g. restrict inappropriate content, limit installing apps, etc.) We suggest you take some time on this screen to learn about all the different options. It is also here where you can see exactly how much time your child has spent on their phone during the last day and the last week. Please see detailed instructions on how to set up Downtime, App Limits and Password in the following section.
How to set up Screen Time for your child directly on a device
Though Family Sharing is a great tool, it isn't for everyone. If you'd prefer not to give your child their own Apple ID just yet and would instead like to set up Screen Time directly on the device your child will use, you can absolutely do that as well. Here's how.
-
Launch Settings.
-
Tap Screen Time. You'll see a list of insights that Screen Time provides.
-
Tap Continue.
-
Tap This is My Child's iPhone/iPad to set up Screen Time on this device for a child. You can then set a Downtime (i.e. a chunk of time — say, nighttime — when you don't want them using their device).
-
Tap Start.
-
Select a start time.
-
Tap Start again. Do the same for the End time.
-
Tap Set Downtime to save your settings.
-
Set your child's App Limits (the amount of time per day that you want your kiddo to spend on certain categories of apps). For instance, if you only want them to spend 30 minutes per day playing games, then tap Games to select that category. Then scroll down to the bottom to where it says Time Amount, enter 30 minutes, then tap Set App Limit. You can set limits on as many individual app categories as you like, or you can set an umbrella time for all apps.
-
Tap Continue after reviewing Content & Privacy controls.
-
Create a four-digit Parent Passcode using the numerical keyboard. Your child's device will require this passcode in order to allow for more time or to change any Screen Time settings.
-
Re-enter the passcode.
That's it! The Screen Time settings on your child's device are now in place. If you ever want to make any changes, all you'll need to do is launch Screen Time using the first two steps in the tutorial above and then enter your Parent Passcode.
How to set communication limits for your child
Beginning with iOS 13 and iPadOS 13, Screen Time includes the ability to create communication limits. These limits, which you can set for yourself and your children, apply to Phone, FaceTime, Messages, and iCloud contacts.
-
Launch the Settings app on your mobile device.
-
Tap Screen Time.
-
Scroll down to , and tap your child's name.
-
Select Communication Limits.
-
Enter your Screen time password, if applicable.
-
Tap During Allowed Screen Time
-
On the next screen, you can decide Allowed Communication is Everyone or Contacts Only.
-
Tap the Allow Introductions in Groups toggle if you want to allow people to be added to group conversations when someone is already a contact or family member.
-
Tap the Back button at the top left.
-
Select During Downtime to limit who your child can communicate with during downtime or after app limits have expired.
-
On the next screen, you can decide Allowed Communication is Everyone or Contacts Only.
-
Tap the Back button at the top left.
-
From the Communications Limits screen, tap the Manage (Your Child's Name) Contacts toggle if you'd like to manage their iCloud contacts remotely.
-
Toggle Allow Contact Editing if you'd like to turn contact editing on/off for your child.
How to create and add a child account to Family Sharing
Share your apps, games, books, and movies with all members of your family (if you want).
7 Sep 2018 - iMore.com
Family Sharing is one of the best features of iCloud. It allows every member of a family to share their purchases of apps, movies, books, TV shows, and music with other family members. There are other benefits, too: pooled iCloud storage, a shared family calendar and photo album, and an easy way to know the location of all family members — and their devices.
Usually, only people 13 and older can have an Apple ID. But kids under 13 can be added to a family sharing account with their own Apple ID. It's simple; here's how to do it.
Adding a child account to Family Sharing on a Mac
-
From the Apple menu, choose System Preferences.
-
Click iCloud.
-
Click Manage Family.
-
At the bottom of the list of family members click the + button.
-
Select Create an Apple ID.
-
Click Continue.
-
Enter the child's information, including creating a new Apple ID, and click Continue. If the Apple ID you want to create is already in use by someone else, you'll be notified so you can make another attempt.
-
Click OK.
-
Enter the CVV from your credit card.
-
Click Agree.
-
Enter security questions and answers.
-
Click Continue.
-
Agree to iCloud and Game Center Terms and Conditions.
-
Click Agree.
-
Agree to iTunes Terms and Conditions.
-
Click Agree.
-
Enter your password to view account details.
-
Click Continue.
-
Click Done.
Adding a child account to Family Sharing on an iOS device
-
Tap Settings.
-
Tap your name.
-
Tap Family Sharing.
-
Tap Add Family Member....
-
Tap Create a Child Account.
-
Tap Next.
-
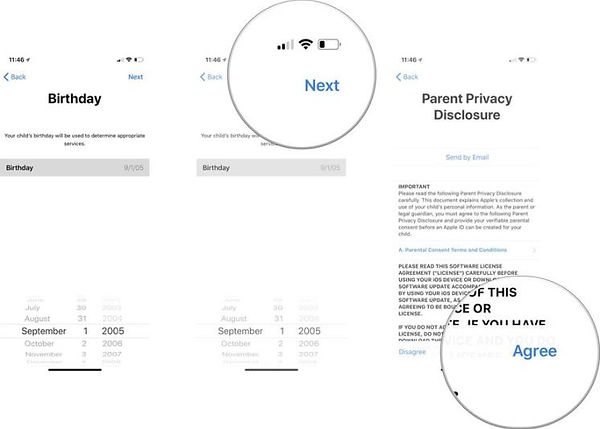
Enter the child's birthday.
-
Tap Next.
-
Tap Agree.
-
Enter your credit card security code.
-
Tap Next.
-
Enter the child's First Name and Last Name.
-
Tap Next.
-
Create an Apple ID.
-
Tap Next.
-
Tap Create.
-
Enter a password for the account and verify it.
-
Tap Next.
-
Enter a security question and answer.
-
Tap Next.
-
Repeat Steps 19 and 20 for two more security questions and answers.
-
Choose whether or not to turn on Ask to Buy. (Hint: There's a reason why it's on by default).
-
Tap Next.
-
Choose whether or not to share location with your family.
-
Tap Agree for the iCloud and Game Center Terms and Conditions.
-
Tap Agree.
-
Tap Agree for the iTunes Terms and Conditions.
-
Tap Agree.


Turn off social media or specific apps on your child's phone from your phone! Set on and off times for your kid's phone! And more!